Seamless Migration: Upgrading from Free to Personal VPS
Ready to scale? Learn how N8Nme automatically migrates your workflows when upgrading from the free isolated instance to your own dedicated VPS.
From Shared to Personal: Why Upgrade?
N8Nme's free tier is perfect for learning, experimenting, and running small-scale automations. But as your automation needs grow, you'll eventually hit the limits of the free dockerized environment. That's when upgrading to a personal VPS makes sense.
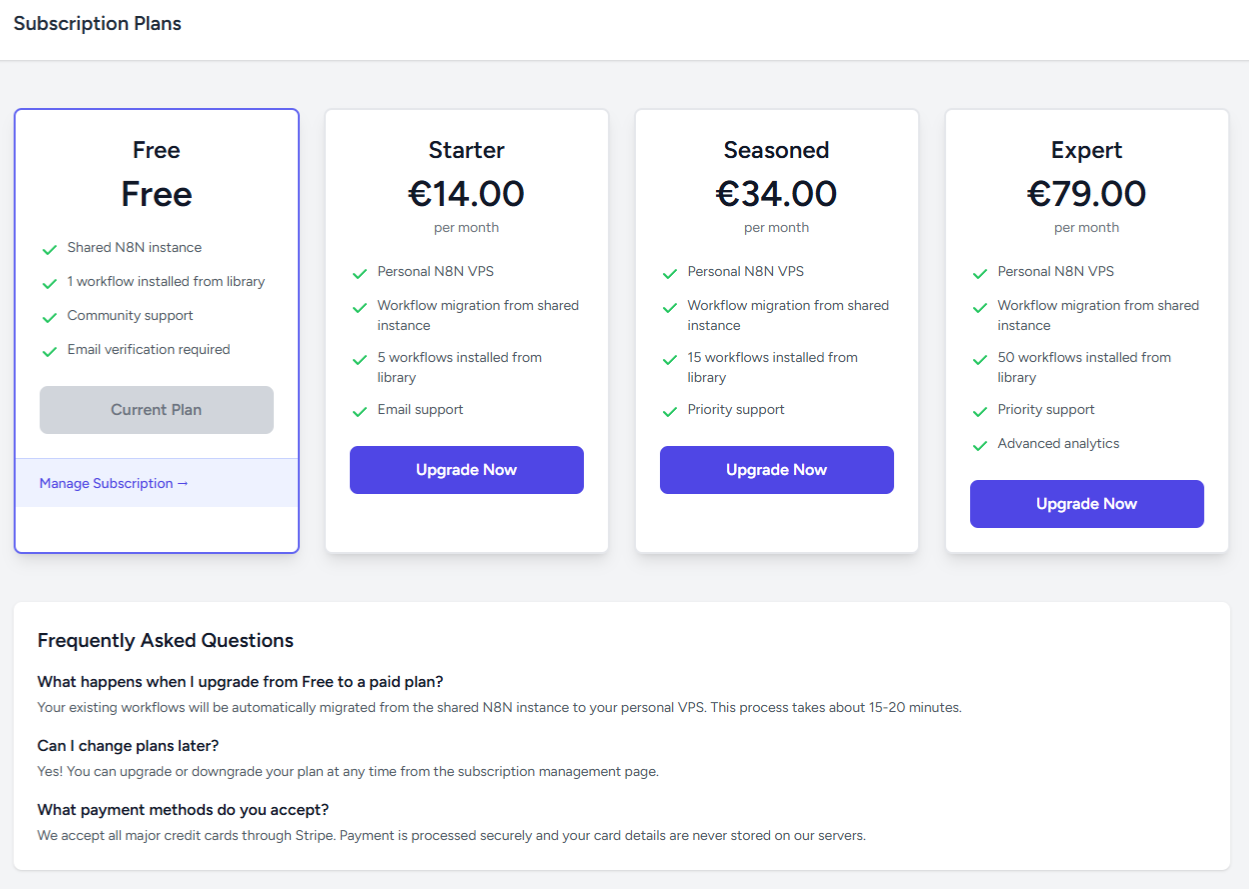
Here's what changes when you upgrade:
| Feature | Free (Shared) | Starter (Personal VPS) |
|---|---|---|
| Workflows | 1 workflow installed from the library | 5 workflows installed from the library |
| Resources | Capped at 1GB memory | Dedicated VPS (Quad-core CPU, 8GB mem, 150GB SSD) |
| Performance | Variable | Guaranteed |
| Region | Europe only | Choose from 7 regions |
| Subdomain | {team-slug}-free.n8nme.com | {team-slug}.n8nme.com |
| Support | Community | Email support |
The Migration Process
One of the biggest concerns when upgrading infrastructure is downtime. Will your automations stop working? Will you lose data? Do you need to manually recreate everything?
The answer is: No, no, and no. N8Nme handles migration automatically with minimal disruption.
What Gets Migrated Automatically
- ✅ Your workflow(s) - Exact copies, including all node configurations
- ✅ Credentials - All API keys and authentication tokens (encrypted)
- ✅ Workflow settings - Active/inactive status, schedules, error handling
- ✅ Execution history - Recent execution logs (last 7 days)
- ✅ Variables - Any environment variables you've configured
What You'll Need to Update
- ⚠️ Webhook URLs - Your webhooks will have a new domain
- ⚠️ External references - If other systems point to your N8N instance
Don't worry, we'll give you clear instructions and a checklist during the migration process.
Step-by-Step: How It Works
Step 1: Choose Your Plan & Region
Navigate to Subscription Plans and select your tier:
- Starter - €14/month, 5 workflows
- Pro - €34/month, 15 workflows
- Expert - €79/month, 50 workflows
During checkout, select your preferred VPS region. Choose based on where your users, data sources, or compliance requirements are.
Step 2: Complete Payment
We use Stripe for secure payment processing. Your subscription starts immediately upon successful payment.
Step 3: Automatic VPS Provisioning
Once payment is confirmed, N8Nme automatically:
- Creates your VPS in the selected region (typically takes 5-10 minutes)
- Installs N8N with optimal configuration
- Configures DNS for your personal subdomain
- Applies SSL certificate for secure HTTPS access
- Sets up monitoring to track instance health
You can watch the progress in real-time from your dashboard. Each step is logged, so you know exactly what's happening.
Step 4: Workflow Migration
Once your VPS is ready, the migration begins:
- Export - Your workflows are exported from the dockerized instance (JSON format)
- Transfer credentials - All API keys and tokens are securely copied (we re-encrypt them for your VPS)
- Import - The workflows are imported to your personal N8N instance
- Validation - We verify the workflows imported correctly and all nodes are configured
- Activation - If your workflows were active before, it's automatically activated on the new instance
This entire process is automated and typically completes in under 2 minutes.
Step 5: Update Webhooks (If Applicable)
If your workflows use webhooks, you'll need to update the webhook URLs in external systems. Your new webhook URLs will be:
Old: https://{team-slug}-free.n8nme.com/webhook/your-hook-id
New: https://{team-slug}.n8nme.com/webhook/your-hook-id
We provide a migration checklist showing all webhooks that need updating, with copy-paste-ready URLs.
Step 6: Verification & Testing
Before we mark the migration complete, we recommend:
- Open your new N8N instance and verify workflows appear correctly
- Check credentials are working (test API connections)
- Execute a test run to ensure workflows function as expected
- Verify schedules are configured correctly
If anything looks wrong, contact support immediately. We can roll back or fix issues quickly.
Migration Timeline
Here's what to expect timing-wise:
| Phase | Duration | What's Happening |
|---|---|---|
| VPS Creation | 5-10 minutes | World-class provider provisions your server |
| N8N Installation | 2-3 minutes | Docker containers deployed and configured |
| DNS Configuration | 1-2 minutes | Your subdomain is configured |
| Workflow Migration | 1-2 minutes | Workflows and credentials copied |
| Total | 10-15 minutes | From payment to fully migrated |
What About Downtime?
Your workflows on the isolated docker instance keep running during migration. There's no interruption to your automations.
The only "downtime" is the brief moment when you update external webhook URLs (if applicable). During that window, webhook-triggered workflows might miss events. For most users, this is acceptable, but if you need absolute zero downtime, contact our support team for a coordinated migration with traffic routing.
Post-Migration: What's Different?
✅ Better Performance
Your workflows now run on dedicated resources. No more competing with other users for CPU, memory, or network bandwidth.
✅ Your Own Subdomain
Access your N8N instance at yourteam.n8nme.com instead of the shared domain. Professional and easy to remember.
✅ Regional Performance
If you selected a region close to your users or data sources, you'll notice lower latency immediately.
✅ More Workflows
Install additional workflows from our library or build new ones. Your plan limit is now 5, 15, or 50 workflows depending on your tier.
Troubleshooting Common Issues
"My workflow isn't working after migration"
Check credentials first. Open the workflow, click on nodes with red markers, and re-authenticate if needed. Sometimes API tokens need to be refreshed.
"I can't access my new N8N instance"
DNS propagation can take a few minutes. If it's been more than 10 minutes, check:
- Are you using the correct URL? (Check your dashboard)
- Try accessing directly via the VPS IP (we provide this)
- Clear your browser cache
"My webhooks stopped receiving data"
You need to update the webhook URLs in external systems. We provide a checklist during migration with all the URLs you need to update.
Ready to Upgrade?
Upgrading from the free tier to a personal VPS is seamless, automated, and takes less than 15 minutes. Your workflows migrate automatically, and you get better performance, more capacity, and a professional subdomain.
View subscription plans and choose the tier that fits your needs. Questions about migration? Contact our support team, we're here to help!